A place to store and share the things I make.

Sunday, March 11, 2012

start to finish, i made it.

I've made a lot of things in my life.  I still use a pin cushion I made from mom's scraps when I was really young.  I made a stuffed pig in 5th grade (Robyn, I swear I gave it to you).  Boxers in Home Ec in middle school.  PJs, pillowcases, cross-stitch and candlewicking.  I think I made some freaky little faces out of nylons stuffed with cotton, then stitched eyes and noses and whatnot so it was all 3D.  I made a stuffed doll for a book project once too.

When I got into college, I started dabbling with quilts. Then a little with clothes.  And I discovered cutting apart perfectly good clothes to make perfectly great new clothes.  Once we moved to Portland things really took off.  I've made things from patterns and from scratch. I've cussed my way through following said patterns. I've started with scraps and only a color scheme and ended up with something pretty cool. But this, this was something new.

This was the first project that I dreamed up, sketched out even, and designed from start to finish.  Sometime last fall it entered the creative part of my brain as I was trying to go to sleep, forcing me to get out of bed and sketch it out quick in my white journal. A baby quilt. A gift, of course. Greys, with a little pink, I thought. Or orange, that way it can be for a boy or girl. I had a sketch, a color scheme, and a little idea of how I wanted to piece it.  How much fabric do I need? That was a guess.  How big of squares? That worked out. It started with this:


This beautiful pile sat patiently on my shelf through the holiday season, put on the back burner for more immediate projects.  It was always in my mind though.  In one afternoon, I started cutting and piecing, cutting and piecing. I do have to admit it would have been a little helpful to have some guidance; I did it sort of stack-n-whack style, and was going crazy trying to organize the right pieces in the right order.  Somewhere I had picked up 7 1/2 inches to start with, and that was the only number I really had to go on. Lo and behold, after much stacking, whacking, shuffling, and piecing, I had a handful of almost perfect 6 1/2 inch squares.  How. did. that. happen.  These were all shades of grey; I hadn't quite figured out how the orange was going to fit in. In addition to the 6 1/2 inch squares, I also ended up with a handful of 6 1/2 x 4 1/2. Why not add the orange to those? Perfect. At the end of an unruly 5 hour session, I had all but 2 squares worth of a crib-size quilt. It was magic. It looked like this that particular day:


But it didn't stay looking that way. I finished the final two squares and arranged and rearranged the squares to get the look I wanted. I didn't want an open maze. I didn't want a square. Too many leading lines and definitely no zigzags. Symmetry? Not really. This was the most tedious part (more than the shuffling, even). Finally, I just settled. Sometimes, you just do. There are only so many details you can attend to. So I pieced together the squares, chose a cotton backing (I didn't buy the flannel one I fell in love with when I bought the rest of the fabric, and of course it was backordered by the time I got back to it).
I quilted it freestyle with random squares and such, with grey thread. I wanted a little character in the border too, so added some flair there.
I know it's a lot easier to do a cheater binding folding over the edge of the back, but I really just prefer a pieced binding. I had intended to use orange scraps, but I just didn't have enough, and didn't want such a bold border (looking at my runner, I much prefer the grey binding anyway). It's worth the extra hand-work, in my opinion. Plus it left me a bunch of extra 2.5x2.5 inch squares to have fun with.
So there you have it. My first design, start to finish. I love it, and have taken way too many pictures that really just don't do it justice. It turned out perfect and I have no complaints. Which might be the reason it is still sitting on my table and hasn't been mailed yet. This baby lives far away, and I know I won't get to see her much as she grows up, but I hope she appreciates this piece of art I made for her. I'm pretty sure it will hold up under the messes she'll probably make on it until then.

Tuesday, March 6, 2012

In the kitchen

I love the kitchen.  I love Saturdays to myself when I can put on NPR and pretend I'm a stay-at-home mom or a homesteader wife.  When I am responsible for making food for our family.  Food is so different than it used to be.  Women (and men, yes) used to make everything. And grow and raise and harvest and milk to get their food.  There weren't always grocery stores down the street, there was a garden out back.  And a cow in the pasture.  I dream of those days, of growing my own food and supporting our family with food that we worked for, not what was brought home from Trader Joe's and QFC.  

But. I work full time. I am the primary provider for our family; right now it's not an option to not work full time. More and more, I am resorting to quick meals or canned pasta sauce or microwave lunches, and being ok with that. It's not an option for us to buy a cow and raise chickens and make my own milk. It's just not.  So I do what I can, when I can.  And dream of the day we live on a farm and our food lives outside our door. Maybe that day will come.  But until then, I'll spend some Saturdays cooped up with Peter Sagal as I make in my kitchen.

Dairy has been my focus over the past couple kitchen dates.  I made my own cottage cheese a couple weeks ago, then made some yogurt this weekend. It's a little thinner than store-bought, but tasty and easy with a crockpot. We've also been regularly making yogurt cheese (aka strained yogurt or greek yogurt).  Even easier! All you do is put some yogurt in a piece of muslin (You can use cheesecloth but use a couple layers--you don't want chunks to get through), tie up the corners and let it hang overnight.  Catch the whey in a bowl and use it in smoothies, soup, or drink it straight.  It's apparently pretty good for you, and adds a little tang.  I froze a bunch in ice cube trays and used it in a smoothie, then used the rest in some bean soup. My favorite use for the cheese is to put it on toast with some jam.

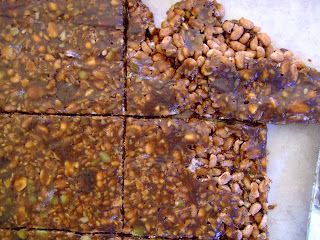
I've been wanting to make my own energy bars for some time now, and that time finally came this past weekend.  A patient brought this recipe to me (I need a whole new file for all the recipes I seem to collect from patients!). Her kids love it. It's quick, easy, and if you have a well-stocked pantry may even take ingredients you already have on hand. And you can make it all your own. I rustled up some almonds, sesame seeds, flax seeds, hazelnuts, and pumpkin seeds, and raisins for mine. 
 I didn't have enough peanut butter, so I made some sunflower butter in the food processor (this page helped me out; I thought it would never turn into butter but she gave me peace of mind! I didn't add anything to mine though).
I didn't roast my seeds and nuts first, which would be something to try.  I used molasses as my sweetener; combined with sweetened raisins, the boy and I agree that it was too sweet.  Next time it will be less molasses or just unsweetened fruit.  We also think that adding orange zest and cranberries, or dates and ginger would be something to explore. 

Energy Bar

Prep time: 20 minutes
Cook time: 5 minutes
Total time: 25 minutes

3/4 cup nut butter (almond or cashew or peanut or sunflower...you get the picture)
3/4 cup sweetener syrup (honey or brown rice syrup or agave; I used molasses)
1 1/2 cups roasted raw nuts or seeds
1 cup unsulfured dried fruit
4 cups gluten-free brown rice crispies cereal (I used EnviroKids Koala Crisp)
1/8 tsp salt
1 tsp vanilla extract

- Line a large baking sheet with parchment paper
- Place nuts and/or seeds and dried fruit in the bowl of food processor.  Pulse several times, just until the mixture is coarsely ground.
- In a large saucepan, melt nut butter with liquid sweetener over medium low heat.  Stir and watch carefully to prevent scorching.  When the mixture is smooth and bubbling, cook for about 1 minute.  Remove from heat.  Add salt and vanilla and stir to combine.  Use a large spatula to stir in nuts, dried fruit, and cereal.  Stir until all ingredients are coated with nut butter mixture.  (Don't forget the cereal--I did and had to roll the rice in later.)
- Scrape mixture on to the prepared baking sheet.  Use the spatula to evenly spread the mixture on the pan.  Place a large piece of waxed paper over the mixture and use a rolling pin to smooth the top of the mixture. Cover with the waxed paper and refrigerate for about 2 hours before cutting the bars. 
- Wrap bars in waxed paper and store in a covered container in the refrigerator.

Yield: about 16-32 bars depending on how they are cut. 

(According to her notes on the recipe, she figures that the bars cost about 36c each.  Much better than a Lara bar, and dare I say just as tasty!)  Leave a comment if you make them and find some killer combination of ingredients!

Sunday, March 4, 2012

I'm keeping this.

I have been spending so  much time making these past few weekends.  I have finished projects I started over a year ago, finished a gift almost before the baby arrived (now mailing it is the next trick...), made something I've been promising Graham for a couple months, and even started and finished a bag--in the same day.  Whoo!

I also finished what has become probably my proudest manipulation of materials.  I designed it from start to finish.  I think it deserves it's own post though, so on to the goods:

I've been dreaming of a bag that was big enough for books and my water bottle and my sewing kit I bring to church, but had a long strap.  Seriously, for years I've looked at bags, but I always use the "but-I-could-make-that" excuse and save my dollars.  These materials were all on my shelf: the red is some indoor dec weight fabric I got for 75 cents at SCRAP; the pocket is a remnant I got from Ikea; the strap is fabric I bought in Guatemala; and the lining is leftovers from Taylen's quilt.  Total cost: I have no idea, but I didn't spend a cent on it yesterday.  After some massive seam ripping on the lining, I did have a few moments of "oh this is why people use patterns", but I think in the end it would have taken me longer that way.  I've been toting it around just asking people to comment on it. Feel free to comment on it yourself. :)
Outside pocket is cell-phone worthy
Inside pocket fits the water bottle or just the handy stuff
And here is my Birthday quilt.  Yes, the one I started on my birthday before my last birthday.  That one.  It's finally finished!  And I love it.  And I'm keeping it.  I guess this is a me-post; I feel like I rarely keep the things I make--they are most often baby gifts or birthday gifts or something a friend wanted me to make.  But these, these are for me.  I think that's ok.
my fancy binding clips

 This started out as the prototype for the aforementioned proudest project, and turned into a table runner.  I'm keeping this too.  Since I have to give (get to give!) away the other one.
 And finally, I got another mini-quilt hanging.  It doesn't have a home on a wall yet, but it's at least hang-able.  I made this for Graham for our anniversary.  It's a topographic map of Crooked River, where his family has a home.  It's our little getaway, and a place where he has a lot of memories from growing up.  One of the reasons it took so long for me to get it hung was that I wanted to use a stick that I found out at the cabin.  So here it is.  I don't love it yet, but I think it's because we don't have a wall for it.  I do love the actual quilt though.  I'd like to work on more at some point...it's one of the things I've done that I feel is completely original, or at least I haven't seen anyone else doing it yet.

That was a lot!  But that's what I've been up to in my little sewing room.  I've been up to lots in the kitchen too, but I'll share more of that in another post.  I'll check this one off the to-do list for now.  Happy weekend!